

Supplies
1 tube of choice – I used the artwork of Barbara Jensen which can be
purchased from her tube store here. You must have a license to use.
Font of choice – I used Santas
Big Secret here
Weescotlass Mask 208 here
Plug Ins used:
Mura’s Meister - Copies
Greg’s Factory Output Vol. II – Pool Shadow
“Sweets for Santa” is a full size
scrap kit created by Kesha of KnC Scrapz and can be purchased from her store Lollipopsn Gumdrops. You can visit her blog here.
Thank you Kesha for a fantastic holiday kit.
~♥~ Let’s get started ~♥~
Open up a 700 x 700 blank canvas.
Flood fill white.
This is your working canvas, but move this aside for now.
Open a new 500 x 500 blank canvas.
Copy and paste your tube as a new layer.
It doesn’t matter how big it is so long as the entire tube is on the
canvas.
Apply Mura’s Mesiter – Copies:
Wallpaper
OK
The entire canvas should be wallpapered now with your tube. If not, undo and redo the Mura’s Meister
Wallpaper effect but make the Number higher.
Move this off to the side for now.
Open up Paper 10.
In your color pallet:
Foreground: Null
Background: Pattern/Paper 10
Make your working canvas active.
Make your Ellipse Tool active set on Circle.
Create a circle approximately 500 pixels.
Objects/Align/Center in Canvas.
Convert to Raster layer.
Click anywhere outside of it with your Magic Wand.
Selections/Invert
Selections/Modify/Contract by 50
OK
Tap the delete key.
Deselect.
Select All/Float/Defloat
Selections/Modify/Contract by 10.
OK
Tap the delete key.
Deselect.
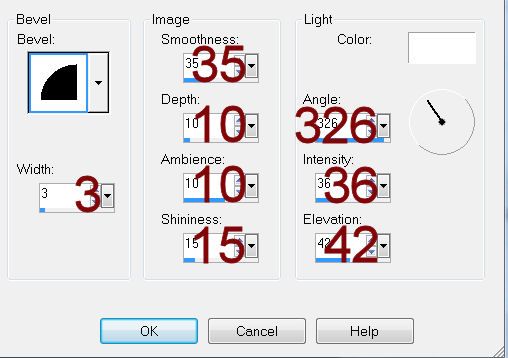
Give it a slight Inner Bevel:
Adjust/Add Remove Noise/Add Noise:
Gaussian and Monochrome checked:
Noise: 42%
OK
Click inside the space (not the center of the circle) with your Magic
Wand.
Selections/Modify/Expand by 2.
New Raster layer below this new frame you created.
Copy and paste Paper 4 Into Selection.
Copy the wallpaper you made.
Paste Into Selection.
Change the Properties to Soft Light.
Deselect.
Highlight the frame layer.
Click inside the frame (in the center) with your Magic Wand.
Selections/Modify/Expand by 4.
New Raster layer just above your white canvas.
Copy and paste Paper 10 Into Selection.
Deselect.
Color Pallet:
Foreground: #000000
Background: Null
Make your Ellipse Tool active set on Circle
Width: 2
Create a circle that’s slightly larger than the inner circle of the
frame – it’s alright if the circle is either too large or small.
Objects/Align/Center in Canvas
Now you can resize the circle so that it’s the correct size.
Color Pallet:
Foreground: #000000
Background: Pattern/Paper 10
Stroke: .80
Move your mouse along the circle until you see a Rocking A.
Click your mouse.
A text box will appear.
Type the word Naughty as
many times as you like until it comes around full circle.
Click on the + sign in the layers pallet.
Click on the eye of the New Ellipse layer to shut that layer off.
Highlight Vector 1 layer.
Right Click
Convert to Raster layer.
Copy and paste Cookie 3 as a new layer.
Resize 10% and 60%
Duplicate as many times you need, placing a cookie in between each word
– see my tag for reference.
Copy and paste your tube as a new layer.
Place at one side of the circle.
Color Pallet:
Foreground: #000000
Background:#ffffff
Type out the words: (after typing out a line Convert it to a Raster layer
before typing the next line) -
Line 1: Let’s be
Line 2: Naughty
Line 3: and save
Line 4: Santa
Line 5: the
Line 6: trip
Move each line into position – see my tag for reference.
Merge Visible all word line layers.
Adjust/Add Remove Noise/Add Noise:
Gaussian and Monochrome checked:
Noise: 73%
OK
Merge Visible all word line layers.
Adjust/Add Remove Noise/Add Noise:
Gaussian and Monochrome checked:
Noise: 73%
OK
Copy and paste Paper 7 as a new layer.
Resize 60%
Move into position – see my tag for reference.
Copy and paste Paper 1 as a new layer.
Resize 60%
Move into position – see my tag for reference.
Add your elements. I used:
Tree: Resize 65%/Duplicate
Flower: Resize 30% and 90%/Duplicate/Mirror
Cookie 1 & 4: Resize 30%
Ornament 3: Resize 50%/Erase the
string/Duplicate/Mirror
Highlight your white background.
New Raster layer.
Select All.
Copy and paste Paper 10 Into Selection.
Deselect.
Apply the mask.
Resize 110%
Merge Group.
Add your credits.
Add your name.
Color Pallet:
Foreground: #ffffff
Background: Pattern/Paper 10
Stroke: 1.0
Type your name.
Convert to Raster layer.
Select All/Float/Defloat
Selections/Modify/Contract by 1
Apply Greg’s Factory Output Vol. II – Pool Shadow:
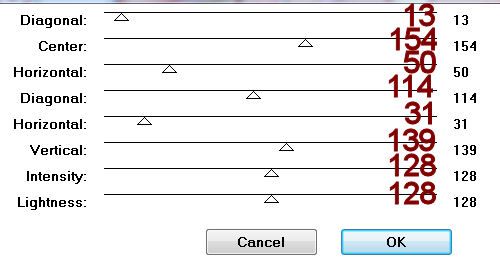
OK
Deselect.
Resize all layers 80%.
No comments:
Post a Comment