

Supplies
1 tube of choice – I used the artwork of Anna Marine which can be
purchased from CDO. You must have
a license to use.
Font of choice – I used Inspiration here
Weescotlass Mask 362 here
Dee’s Sign Post “Calandra Craze” Template here
You can find it under Saturday, September 8, 2012.
“Harvest of Blessings” is a tagger size scrap kit created by me, Bev of
HorsePlay’s Pasture Designs and can be purchased from either of your favorite stores – Lollipops n Gumdrops or Butterfly Blush Designs or Inspirations of ScrapFriends. You can visit
my designing blog here.
~♥~ Let’s get started ~♥~
Open up the template.
Shift + D.
Close out the original.
Delete the top 7 layers, Grunge Swirl layer, Green Circle, and Blue
Circle layers.
Flood fill white.
Highlight Purple Square layer.
Click on it with your Magic Wand.
New Raster layer.
Copy and paste Paper 7 Into Selection.
Deselect.
Delete the template layer.
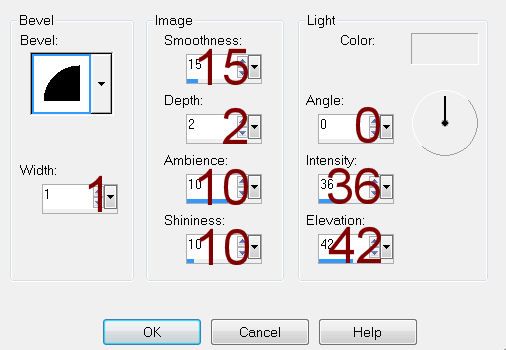
Give it a slight inner Bevel.
Highlight Purple Rectangle layer.
Click on it with your Magic Wand.
New Raster layer.
Copy and paste Paper 4 Into Selection.
Deselect.
Delete the template layer.
Give it the same slight inner Bevel.
Highlight Orange Circle layer.
Click on it with your Magic Wand.
New Raster layer.
Copy and paste Paper 13 Into Selection.
Deselect.
Delete the template layer.
Give it the same slight inner Bevel.
Highlight Blue Oval layer.
Click on it with your Magic Wand.
New Raster layer.
Copy and paste Paper 12 Into Selection.
Copy and paste your tube as a new layer over the paper layer. Move into position – see my tag for reference.
Change the Properties to Soft Light.
Selections/Invert
Tap the delete key.
Deselect.
Delete the template layer.
Give the paper layer the same slight inner Bevel.
Highlight Green Rectangle layer.
Click on it with your Magic Wand.
New Raster layer.
Copy and paste Paper 15 Into Selection.
Deselect.
Delete the template layer.
Copy and paste your tube as a new layer.
Add your elements. I used:
El 40: Resize 40%
El 41: Resize 25%
El 15: Resize 30%
El 11: Resize 40%
El 28: Resize 50%/Position
behind bottom left of oval paper/Duplicate/Resize 90%/position near upper right
of tag behind rectangle shape
El 9: Resize 50%/Mirror
El 61: Resize
50%/Duplicate/Mirror
El 15: Resize 25/Free rotate
Left 30 degrees
El 58: Resize 25%
El 59: Resize 25%/Free rotate
Right 25 degrees
El 60: Resize 25%
Highlight your white background.
New Raster layer.
Select All.
Copy and paste Paper 10 Into Selection.
Deselect.
Apply the mask.
Resize 110%
Merge Group.
Add your credits.
Add your name.
Resize all layers 80%.
No comments:
Post a Comment