

Supplies
1 tube of choice – I’m using the beautiful artwork of Carol Moore which
can be purchased from PSP Tube Stop. At present the tube is included with the kit at a great savings to both tube and kit! You must have
a license to use.
Font of choice - I used Before the Rain here
“Faith” is a tagger size scrap kit created by me, Bev of HorsePlay’s
Pasture Designs and can be purchased from
PSP Tube Stop. You can visit my
designing blog here.
This tutorial was written assuming you have a working knowledge of PSP.
~♥~ Let’s get started ~♥~
Open up a 700 x 700 blank canvas.
Flood fill white.
Copy and paste El 13 as a new layer.
Resize 55%
Duplicate/Resize 85%
Move the larger frame down and to the left just a little and the
smaller frame toward the upper right corner just a little – see my tag for
reference.
Highlight the larger frame.
Click inside of it with your Magic Wand.
Selections/Modify/Expand by 4.
New Raster layer below the frame.
Copy and paste Paper 3 Into Selection.
New Raster layer.
Copy and paste Paper 1 Into Selection.
Change the Properties to Multiply.
Copy and paste your tube as a new layer below the frame.
Selections/Invert
Tap the delete key.
Deselect.
Highlight the smaller frame.
Click inside of it with your Magic Wand.
Selections/Modify/Expand by 4.
New Raster layer.
Copy and paste Paper 3 Into Selection.
New Raster layer.
Copy and paste Paper 1 Into Selection.
Change the Properties to Multiply.
Copy and paste your tube as a new layer below the frame – keep this
tube layer resized a bit larger than the other tube layer.
Change the Properties to Luminance.
Selections/Invert
Tap the delete key.
Deselect.
Copy and paste El 31 as a new layer – be sure it’s at the top of your
layers pallet because we’re going to work with this for a little bit.
Resize 60%/Mirror
Copy and paste El 55 as a new layer.
Resize 50%/Duplicate/Free rotate Left 90 degrees.
Position the vertical ribbon over the left edge of the ripped paper –
see my tag for reference.
Position the horizontal ribbon along the top edge – see my tag for
reference. Use your Eraser Tool
(hardness set to about 15) to erase what overhangs the tag. With the hardness set so low use it to give
the ribbon a feathered look near the ripped area of the tag.
Merge Visible both ribbon layers and the tag layer.
Duplicate
Move both merged layers into position – see my tag for reference.
Add your elements. I used:
El 16: Resize 40%/Mirror
El 39: Resize 85%
El 18: Resize 50%/Duplicate
El 17: Resize 80%
El 35: Resize 70%
El 28: Resize 40%
El 71: Duplicate
Highlight your white background.
New Raster layer.
Select All.
Copy and paste Paper 14 Into Selection.
Deselect.
Apply the Mask.
Merge Group
Use your Pick tool to pull the top and bottom in just a little.
Duplicate
Crop your tag.
Add your credits.
Add your name.
Foreground and Background: #583a27
Type your name.
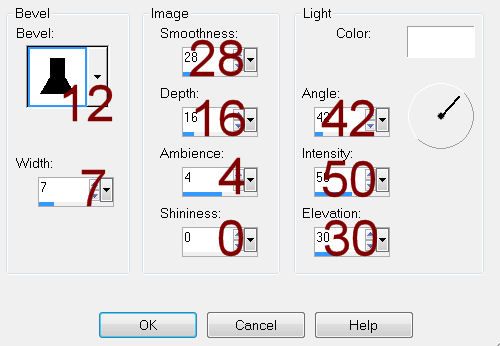
Give it a slight Inner Bevel:
Resize all layers 80%.
No comments:
Post a Comment