

Supplies
1 tube of choice – I used the beautiful artwork of Carrie Hall which
can be purchased from Up Your Art. You must have
a license to use.
Font of choice - I used Party Business here
Weescotlass Mask 362 here
Plug Ins used:
Greg’s Factory Output Vol II – Pool Shadow
“Dark Lady” is a tagger size scrap kit created by Sandrine of Rebellious
Scraps and can be purchased from Butterfly Blush Designs. You can visit
her blog here.
Thank you Sandrine for a really awesome kit.
This tutorial was written assuming you have a working knowledge of PSP.
~♥~ Let’s get started ~♥~
Open up a 700 x 700 blank canvas.
Flood fill white.
Copy and paste Frame 1 as a new layer.
Resize 70%
Duplicate/Resize 80
Copy and paste Razor Blade as a new layer.
Resize 70%
Free rotate Left 90 degrees
Move both frames and razor blade into position – see my tag for
reference.
Highlight the largest frame.
Click inside of it with your Magic Wand.
Selections/Modify/Expand by 3.
New Raster layer below the frame.
Copy and paste Paper 7 Into Selection.
Duplicate
Adjust/Blur/Motion Blur:
Angle: 49
Strength: 84.77%
OK
Apply Greg’s Factory Output Vol. II – Pool Shadow:
Use Default Settings
OK
Copy and paste your tube below the frame – If you’re using the same
tube I did, resize 110%
Selections/Invert
Tap the delete key.
Deselect.
Highlight the smaller frame.
Click inside of it with your Magic Wand.
Selections/Modify/Expand by 2.
New Raster layer below the frame.
Copy and paste Paper 7 Into Selection.
Duplicate
Adjust/Blur/Motion Blur:
Angle: 49
Strength: 85%
OK
Apply Greg’s Factory Output Vol. II – Pool Shadow:
Use Default Settings
OK
Copy and paste your tube below the frame.
Selections/Invert
Tap the delete key.
Change the Properties to Multiply.
Deselect.
Add your elements. I used:
Netting 2: Resize 90%/Duplicate/Flip/Miror
Crystal Ball: Resize 35%
Leaves: Resize 30%/Mirror
Rose 4: Resize
35%/Duplicate/Mirror
Cross: Resize 50%/Free rotate
Left 10 degrees
Crow: Resize 35%
Lantern: Resize 50%
Highlight your white background.
New Raster layer.
Select All.
Copy and paste Paper 1 Into Selection.
Deselect.
Apply the mask.
Use your Pick Tool and pull the sides out just a little.
Merge Group.
Crop your image.
Add your credits.
Add your name.
Foreground: Pattern/Paper 4
Angle: 0
Scale: 27
Background: #202020
Stoke: 1.0
Type your name.
Give it a slight Inner Bevel:
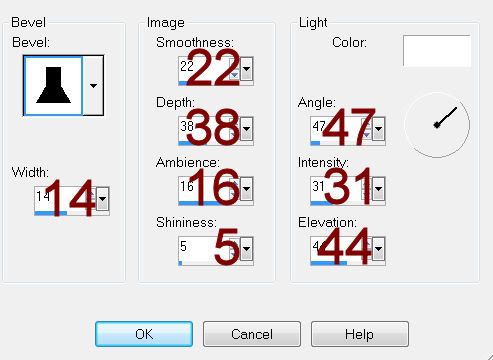
Apply the Inner Bevel 2 more times.
Resize all layers 80%.
No comments:
Post a Comment