

Supplies
1 tube of choice – I used the beautiful artwork of KR Drawings which
can be purchased from The PSP Project. You must have
a license to use.
Font of choice - I used Aquarelle here
Weescotlass mask 220 here
Divine Intentionz template 267 here
Plug Ins used:
Eyecandy 3.1 – Glow
Xero - Porcelain
“Whisper of Love” is full size scrap kit created by Karen of Sweet Occasion
Designs and can be purchased from Lollipops n Gumdrops. You can visit
her blog here.
Thank you Karen for a really beautiful kit.
This tutorial was written assuming you have a working knowledge of PSP.
~♥~ Let’s get started ~♥~
Open up the template.
Shift + D.
Close out the original.
Image/Canvas Size:
700 x 600
OK
Open up the background layer.
Flood fill white.
Delete the top 6 layers, Frame, and Frame Background.
Highlight Oval layer.
Click on it with your Magic Wand.
New Raster layer.
Flood fill with #fbf9f0.
Copy and paste Paper 9 Into Selection.
Effects/Texture Effects/Mosaic Glass:
Use Default settings.
Deselect
Give the paper layer a small drop shadow of choice.
Highlight the flood fill layer.
Apply Eyecandy 3.1 – Glow:
Width: 3
Opacity: 100%
Opacity Drop off: Fat
Color: #261e14
Delete the template layer.
Highlight White Rectangle layer.
Click on it with your Magic Wand.
New Raster layer.
Copy and paste Paper 12 Into Selection.
Effects/Texture Effects/Mosaic Glass:
Use Default Settings.
Deselect.
Delete the template layer.
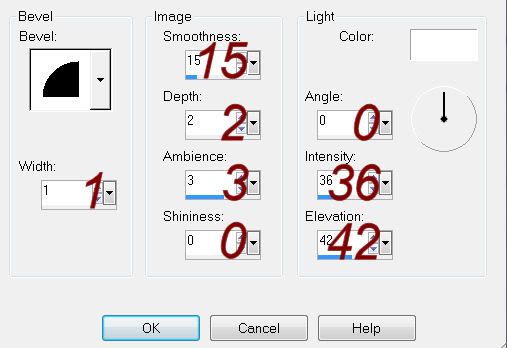
Give it the same slight Inner Bevel:
Highlight Pink Rectangle layer.
Repeat the above step.
Highlight Thin Rectangle 2 layer.
Merge Down.
Thin Rectangle 2 and 1 should now be on the same layer.
Click on both rectangles with your Magic Wand.
New Raster layer.
Flood fill with #261e14
Deselect.
Delete the template layer.
Highlight Dotted Line 2 layer.
Merge Down.
Both dotted line layers should be on the same layer.
In your Color pallet:
Foreground: #ff44a1
Background: #261e14
Make your Color Replacer Tool active.
Zoom in and hold the replacer tool over one of the dots and double
right click the mouse.
Highlight Rectangle layer.
Click on it with our Magic Wand.
New Raster layer.
Copy and paste Paper 8 Into Selection.
Copy and paste your tube as a new layer – move into position over the
paper.
Selections/Invert
Tap the delete key.
Change the Properties to Overlay.
Apply Xero – Porcelain:
Use Default settings accept lower the Blue Channel button to 0.
Deselect.
Delete the template layer.
Give the paper layer the same Inner Bevel.
Copy and paste Pearl Frame as a new layer.
Resize 35%
Free rotate Left 10 dgrees
Move into position – see my tag for reference.
Click inside of the frame with your Magic Wand.
Selections/Modify/Expand by 3.
New Raster layer below the frame.
Copy and paste Paper 7 Into Selection.
Copy and paste your tube as a new layer over the paper layer.
Selections/Invert
Tap the delete key.
Deselect.
Change the Properties to Overly.
Duplicate
Add your elements. I used:
Bow 4: Resize 35% and 90%
Roses 1: Resize 30%
OutlawbyDesignft529: Resize 25%
Flower 4: Resize 10%/Duplicate
Flower 3: Resize 10% and 70%/Duplicate
Butterfly 1: Resize 20%/Free
rotate Right 15 degrees/Duplicate/Mirror/Resize 70%/Duplicate/Mirror/Resize 70%
Circle Pearl Frames Frame 8 Scrap and Tubes: Resize 40%/Duplicate
Highlight your white canvas.
New Raster layer.
Select All.
Copy and paste Paper 4 Into Selection.
Deselect.
Apply the mask.
Resize 105%%
Merge Group.
Add your credits.
Add your name.
Resize all layers 80%
No comments:
Post a Comment