

Supplies
1 tube of choice – I used the wonderful artwork of Rachel Anderson
which can be purchased from CDO. You must have a license to use.
Font of choice - I used Wretched here
Weescotlass Mask 208 here
“Heavenly” is tagger size scrap kit created by Patricia of Designs by
Patricia and can be purchased from TwilightScraps. You can visit her blog here.
Thank you Patricia for such a beautiful kit.
This tutorial was written assuming you have a working knowledge of PSP.
~♥~ Let’s get started ~♥~
Open up a 700 x 700 blank canvas.
Flood fill white.
Copy and paste Frame as a new layer.
Click inside of it with your Magic Wand.
Selections/Modify/Expand by 4.
New Raster layer.
Copy and paste Paper 9 Into Selection.
Deselect for now.
Copy and paste your tube as a new layer.
Position it in front of the left side of the frame – see my tag for
reference.
Duplicate/Mirror
Move below the frame and into position – see my tag for reference.
Highlight the paper layer.
Click anywhere outside of it with your Magic Wand.
Highlight the tube layer just above the paper.
Tap the delete key.
Change the Properties to Luminance (Legacy)
Copy and paste ladder as a new layer just above the paper layer.
Resize 70%
Move into position.
Tap the delete key.
Deselect.
Copy and paste Fog as a new layer.
Move into position – see my tag for reference: (without looking at the
name of the element I thought it was water so I used it as a water puddle)
In your layers pallet be sure it’s below the tube layer that’s
positioned in front of the frame.
Copy and paste Basket as a new layer.
Resize 40%
Mirror
Move into position - see my tag for reference.
Duplicate the tube layer that’s positioned in front of the frame.
Flip.
Move below the original tube layer and position it so that it looks
like the reflection in the water.
Change the Properties to Multiply.
Lower the Opacity to about 87.
Repeat the above step with the Basket.
Merge visible the flipped tube and basket layers.
Highlight the fog (water) layer.
Select All/Float/Defloat
Selections/Invert
Highlight the merged layer.
Tap the delete key.
Selections/Modify/Inside Outside Feather:
Both checked
Feather amount: 30
OK
Deselect.
Add your elements. I used:
Bow: Resize 30%
Butterflies(2): Resize 60%
Hanger(2): Resize 50%
Lovely Lilac: Resize 60%
Lovely Lilac: Resize 60%
Tree: Resize 90%/Mirror/Erase
the base if you can see it
Plant(2): Resize 90%
Bird: Resize 15%
Plant 3: Position behind the
frame/erase the bottom of the stem.
Plant 3 again: Resize
70%/position at right side of the frame
Sparkles 2: Resize 40%
Highlight your white canvas.
New Raster layer.
Select All.
Copy and paste Paper 8 Into Selection.
Deselect.
Apply the mask.
Resize 105%
Merge Group.
Add your name.
Foreground: #000000
Background: Pattern/I sectioned
off the dress of my tube.
Stroke width: 1.0
Type your name.
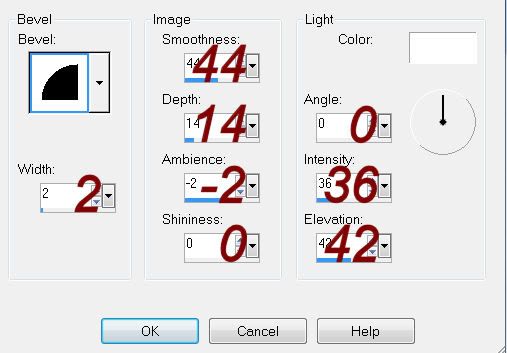
Give it a slight Inner Bevel:
Resize all layers 80%
No comments:
Post a Comment