

Supplies
1 tube of choice – I used the adorable artwork of Lisa Victoria which
can be purchased from Up Your Art. You must have a license to use.
Font of choice - I used Childish Alpha and Bibliotheque
Becky Mask 22 here
Divine Intentionz template 446 here
“Once Upon a Time” is a tagger size scrap kit created by Nette of Nette’s
NightOwl Works and can be purchased from her store Country Corner Creations. You can visit her blog here.
Thank you Nette for an adorable kit!!
This tutorial was written assuming you have a working knowledge of PSP.
~♥~ Let’s get started ~♥~
Open up the template.
Shift + D.
Close out the original.
Resize all layers 85%
Image/Canvas Size
700 x 500
OK
Delete the top 4 layers, Thin Rectangle 2, Square 1 and Square 2
layers.
Open up the background layer.
Flood fill white.
Highlight Rectangle 1 layer.
Click on it with your Magic Wand.
New Raster layer.
Copy and paste Paper 6 Into Selection.
Deselect.
Delete the template layer.
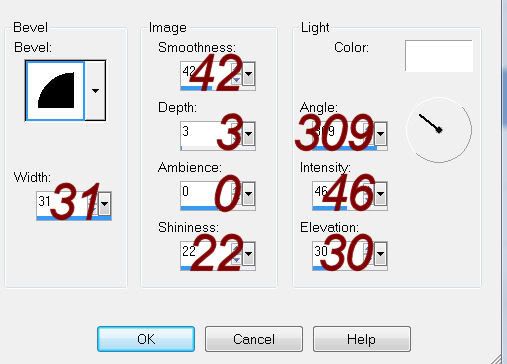
Give it a slight Inner Bevel:

Highlight Small Square layer.
Click on it with your Magic Wand.
New Raster layer.
Copy and paste Paper 8 Into Selection.
Deselect.
Delete the template layer.
Give it the same slight Inner Bevel.
Highlight Rounded Edge Square 1 layer.
Click on it with your Magic Wand.
New Raster layer.
Copy and paste Paper 3 Into Selection.
Deselect.
Delete the template layer.
Give it the same slight Inner Bevel.
Highlight Rounded Edge Rect2 layer.
Repeat the above step.
Highlight Rounded Edge Square 2 layer.
Click on it with your Magic Wand.
New Raster layer.
Copy and paste Paper 2 Into Selection.
Deselect.
Delete the template layer.
Give it the same slight Inner Bevel.
Highlight Rounded Edge Rect layer.
Click anywhere outside of it with your Magic Wand.
Selections/Invert
New Raster layer.
Copy and paste Paper 1 Into Selection.
Delselect.
Delete the template layer.
Give it the same slight Inner Bevel.
Highlight Circle 2 layer.
Click on it with your Magic Wand.
New Raster layer.
Copy and paste Paper 2 Into Selection.
Deselect.
Delete the template layer.
Highlight Circle 4 layer.
Click on it with your Magic Wand.
New Raster layer.
Copy and paste Paper 8 Into Selection.
Deselect.
Delete the template layer.
Highlight Circle 8 layer.
Click on it with your Magic Wand.
New Raster layer.
Copy and paste Paper 2 Into Selection.
Selections/Invert
Copy and paste your tube as a new layer.
Move into position over the circle layer.
Tap the delete key.
Deselect.
Delete the template layer.
Change the Properties to Overlay.
Highlight Frame Back 1 layer.
Click on it with your Magic Wand.
New Raster layer.
Copy and paste Paper 7 Into Selection.
Deselect.
Delete the template layer.
Highlight Frame Back 2 layer.
Click on it with your Magic Wand.
New Raster layer.
Copy and paste Paper 8 Into Selection.
Deselect.
Delete the template layer.
Highlight Frame layer.
Click on it with your Magic Wand.
New Raster layer.
Copy and paste Paper 4 Into Selection.
Give it a slight Inner Bevel:
Adjust/Add Remove Noise/Add Noise:
Uniform and Monochrome checked
Noise: 20%
OK
Highlight Frame layer.
Click on it with your Magic Wand.
New Raster layer.
Copy and paste Paper 4 Into Selection.
Give it a slight Inner Bevel:
Adjust/Add Remove Noise/Add Noise:
Uniform and Monochrome checked
Noise: 20%
OK
Highlight Circle 6 layer.
Click anywhere outside of it with your Magic Wand.
Selections/Invert
New Raster layer.
Copy and paste Paper 7 Into Selection.
Copy and paste Ouappond as a new layer.
Resize 30%
Move into position over the circle layer.
Selections/Invert
Tap the delete key.
Deselect.
Delete the template layer.
Add your elements. I used:
Pond Stars: Resize 20%
Wood Sign: Resize 25%
Tree: Resize 45%
Fence: Resize 45%
Cattail: Resize: 15%
Castle 2: Resize 35%
Butterfly: Resize 10%
Bow 1: Resize 45%
Mushroom: Resize 10% and 80%
Sparkles 2: Resize 70%
Using the Childish Alpha font type out the words
“Dragon’s” and “Path” or whatever you choose.
Slant each word so it’s aligned with the sign wood before converting
the layers into a Raster layer.
Highlight your white canvas.
New Raster layer.
Select All.
Copy and paste 4 Into Selection.
Deselect.
Apply the mask.
Merge Group.
Add your credits.
Add your name.
Resize all layers 80%.
No comments:
Post a Comment