

Supplies
1 tube of choice - I used the artwork of Abranda Icle which can be purchased from Up Your Art. You must have a license to use.
Font of choice - I used Clive Barker here
Weescotlass Mask 208 here
Dee’s Sign Post “Going Through Hell” template here - it can be found under Friday August 6, 2010.
“Snow Blue” is a Full size scrap kit created by Heppy of H.F. Projekte and can be purchased from his store Inspirations of Scrap Friends. You can visit his blog here.
This tutorial was written assuming you have a working knowledge of PSP.
~♥~ Let’s get started ~♥~
Color Pallet:
Foreground: #000000
Background: #333d58
Open up the template.
Shift + D.
Close out the original.
Image/Canvas Size
7y00 x 700
OK
Highlight Raster 1 layer.
Flood fill white.
Delete the following layers:
Top 3 layers, White Rectangle, Top GTH, Top Black Strip, Top Dotted Frame, Bottom GTH, Bottom Strip, Bottom Dotted Frame
Highlight Bottom Circle layer.
Click anywhere outside of it with your Magic Wand.
Selections/Invert
New Raster layer.
Copy and paste Snowblue 9 Into Selection.
Deselect.
Delete the template layer.
Highlight Large Circle bg layer.
Click on it with our Magic Wand.
New Raster layer.
Flood fill with the background color.
Adjust/Add Remove Noise/Add Noise:
Gaussian and Monochrome checked
Noise: 23%
OK
Deselect.
Delete the template layer.
Highlight Large Circle layer.
Click anywhere outside of it with your Magic Wand.
Selections/Invert
New Raster layer.
Copy and paste Paper 10 Into Selection.
Deselect.
Delete the template layer.
Highlight Top Right Circle.
Click on it with your Magic Wand.
New Raster layer.
Copy and paste Snowblue 1 Into Selection.
Deselect.
Delete the template layer.
Highlight Left Large Circle Frame layer.
Click on it with your Magic Wand.
New Raster layer.
Flood fill with your background color.
Apply the same Noise effect.
Deselect.
Delete the template layer.
Highlight Left Frame bg layer.
Click on it with your Magic Wand.
New Raster layer.
Copy and paste Paper 7 Into Selection.
Deselect.
Delete the template layer.
Highlight Right Frame bg layer.
Repeat the above step.
Highlight Left White Frame layer.
Select All/Float/Defloat
New Raster layer.
Flood fill with your background color.
Apply the same Noise effect.
New Raster layer.
Effects/3D Effects/Cutout:
Match your settings to mine -
Delete the template layer.
Repeat the above step with:
Right white Frame
Large white Frame.
Highlight Frame Background layer.
Click on it with your Magic Wand.
New Raster layer.
Copy and paste Paper 3 Into Selection.
Deselect.
Delete the template layer.
Copy and paste your tube as a new layer.
Add your elements. I used:
5: Resize 50%
20: Resize 40%/Free rotate Right 90 degrees/Duplicate/Mirror
12: Position behind the cog up top and erase the stem that shows below/Duplicate/Resize 25%
18: Resize 25% and 50%/Mirror
6: Resize 60%
Highlight your white canvas.
New Raster layer.
Select All.
Copy and paste Paper 5 Into Selection.
Deselect.
Apply the mask.
Merge Group.
Add your copyrights.
Add your name.
Set the stroke to 1.3
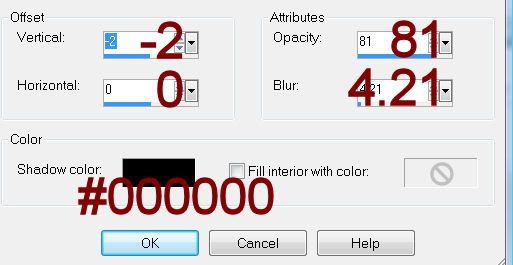
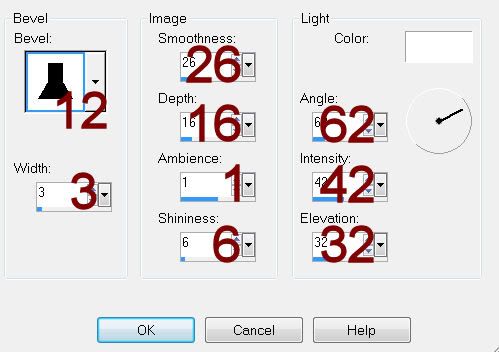
Give it a slight Inner Bevel:
I chose a bird from the tube I used to decorate the name.
I hope you enjoyed this tutorial.
I’d love to see your results.
Email me!
Hugs,
Bev
No comments:
Post a Comment